In the previous article a brief history, main features and a very basic control flow was discussed. Moving on I’d like to go over some important points while installing Jenkins and running it the first time. There are quite a few tutorials showing this part, I feel some lack some introduction to new terms which is what this article is all about. Also, most tutorials start directly with the technical details. I’ve always been more comfortable knowing the ‘what’ and ‘why’ before going into the ‘how’. Keeping that tradition, let me go over ‘what’ and ‘why’ first.
Pre-Requisites – Java and Chocolately
Jenkins is written in Java and therefore requires the ‘JDK’ (Java Development Kit) including the compiler and executor. A lot of tools out there which help to install java, the one I like to use most is Chocolately. They describe it as ‘the package manager for windows’. Essentially it makes installation a lot easier for different packages (software / libraries). Once you get the hang of it (which is very simple), saves a lot of grief and time.
For installing Java you can go to it’s website, download and execute the files, and then add the system variables. Or you can install Chocolately and reduce a few steps. For chocolately installation, you don’t download a file. Instead you just run a batch command and chocolately installs itself! The installation page has all the details. Open the command prompt in administrative mode, run the command and you’re all set.
Now installing Java is a piece of cake. Guess what you have to do? Just run a command in cmd again. You can type ‘Java’ in the search to see all the variants, we would run the command:
‘choco’ making it a chocolately command, ‘install jdk8’ asking to install the JDK package version 8. How easy was that! The best part is, any other future installations are going to be as easy. For instance, installation maven, Angular, Node JS etc are all just one batch command away.
Installation methods
If you go to the Jenkins website’s download page you’ll see many different installation types. Jenkins can be run on a lot of platforms including docker. For Windows users, there are two main options, 1) using the windows installer or 2) get the ‘WAR’ file.
The ‘WAR’ file is Java’s ‘Web Application Resource’ file which includes a collection of different Java files including JARs, JSPs, XML files, web pages and other resources. Jenkins works pretty much the same with both files operation wise as far as my experience, however the method of running them and portability is slightly different.
With windows setup files, run the installer and follow along the wizard, that’s all there is as far as installation goes.
Using command prompt
When I started learning new technologies, I noticed more savvy users were using command prompt versions of most applications. At first felt kind of difficult and less intuitive. However, with time realized once you get the hang of it, things get quite easy and fast. With Jenkins there isn’t much of a difference except how you start the application, however using this way makes things a lot easier.
To run the WAR file, download the file and open the command prompt. CD into the directory where the file is placed and type
That’s it, Jenkins would initialize itself and start running, that’s all as far as ‘installation’ goes. If you are wondering, your right Jenkins does not need to be ‘installed’ here, it runs as an executable. To close the Jenkins server, press ‘CTRL+C’ on the command prompt running Jenkins and the server will close. To restart run the same command for the WAR file as before
Local server
Jenkins deploys a local server which is accessed through ‘localhost:8080’. A local host ‘server’ is used to ‘serve’ web pages / an application when requested by a client, pretty much the same way as web server does. The only difference for the client being the way we access it. A web server will require to enter a ‘URL’ which translates to an IP for a server machine. For our local host, there is no IP needed and it’s just ‘localhost’, and 8080 being the port for accessing.
Back in the day installing a local host server was not a behind the scene process and used to take a while, with layers of abstraction and advancement in development environments, this is now something that gets done behind the scene without the user knowing what all this entails.
Initial Setup
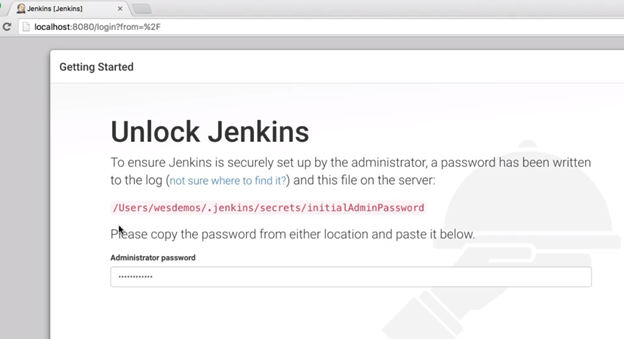
From here on, things are quite straight forward. One first creates an admin user which first requires entering a secure password to access the console. To obtain the password, follow the instructions on the page (In this case, copy the password from the given file):
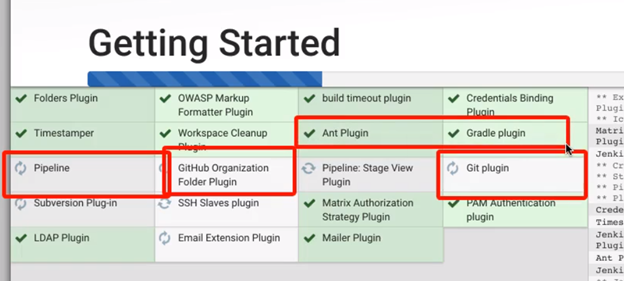
Jenkins 2.0 installs quite a few plugins as part of the default installation. They are very helpful, like some highlighted below.
Jenkins uses XML files for configuration. By default these files are placed at C:\Users\<logged in user>\.jenkins\ and can be viewed (and edited) to see and update Jenkins configurations.
Basic Security
Jenkins deployed on a local ‘server’ means the application can be accessed anywhere on the network, which leads to the need for ‘security’.
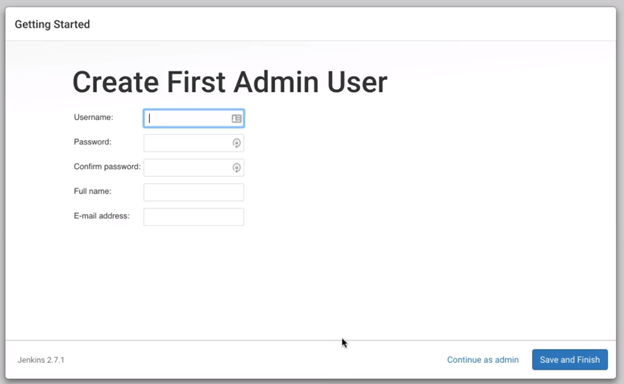
You can have a lot of users for logging in to Jenkins with different privileges (and even access without logging in). Once the plugins are installed, the first Admin User creation dialog appears. Pretty straight forward.
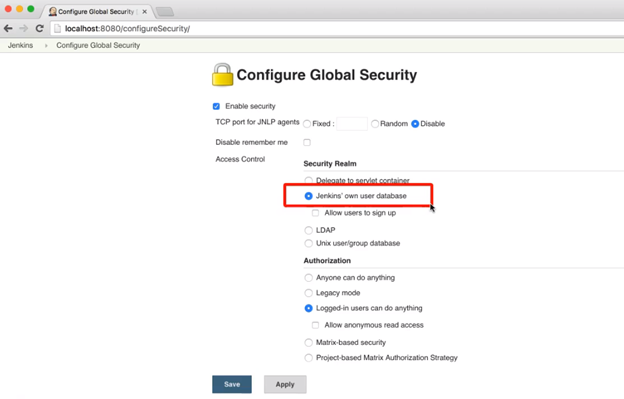
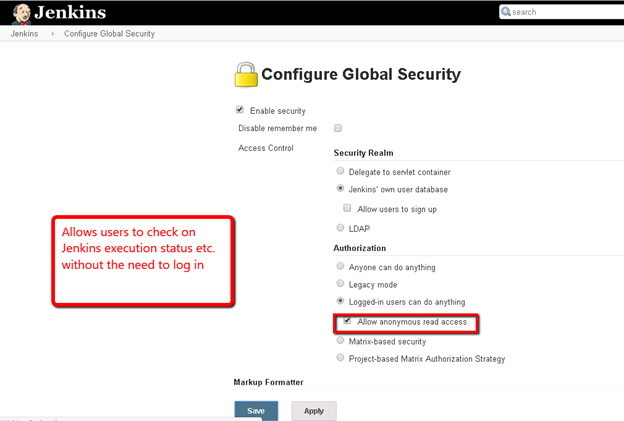
That’s not all for security. Jenkins has a Global security configuration setting also. Here are a few recommended settings to do here:
Read only access
For teams triggering automated tests through Jenkins this is a very powerful feature. You would want a wide access to the reports from your automated runs, which gets a lot easier with this feature. If checked as shown below, anyone on the network can access the localhost server and ‘view’ all jobs and test results, which in my opinion is the way it should be.
If you would like to have intermediate user accounts (between the admin and read only users), you can add / manage user accounts here:

Docker friendly
Before I end this, I must mention Jenkins does run on docker too. That means you can have multiple Jenkins versions running. Or you can have one version but multiple backups of it which takes your environment management to a whole new level.
We talked about pre-requisites of Jenkins, ways to install and run it, using the command prompt, plugins installation and default security. This guide might not server well as a stand-alone piece, however would be great reference material while going through the process.


Leave A Comment