Most testers must have heard about Jenkins, and an increasing number of people are using or looking to use it in their automation and continuous integration efforts. The popularity of Jenkins is unquestionable and still is the most widely used CI tool, due to being open source and an eco-system building around it providing support for integrations with lots of platforms and libraries.
In this post, I thought to create a quick read on what is Jenkins and its main feature. I’m not using any technical terms from the tool and keeping it simple to make it easier for someone new to Jenkins.
Why Jenkins?
But before going into it, why we needed Jenkins? The process of deploying software (on multiple environments) can be tedious. If it can be done automatically will reduce a lot of time and effort which can be used elsewhere. Therefore, the main problem solved is building and deploying software on multiple environments throughout the different SDLC stages and run tests where needed.
History
I naively thought CI was a more recent phenomenon. Jenkins however, was first developed in 2004 by sun microsystems under the name ‘Hudson’. Over the years and legal battles, the name changed to Jenkins along with many changes in ownership till the community became an independent project. Surely this has been one a vibrant and flourishing community resulting in the widely accepted CI tool for many.
What is Jenkins
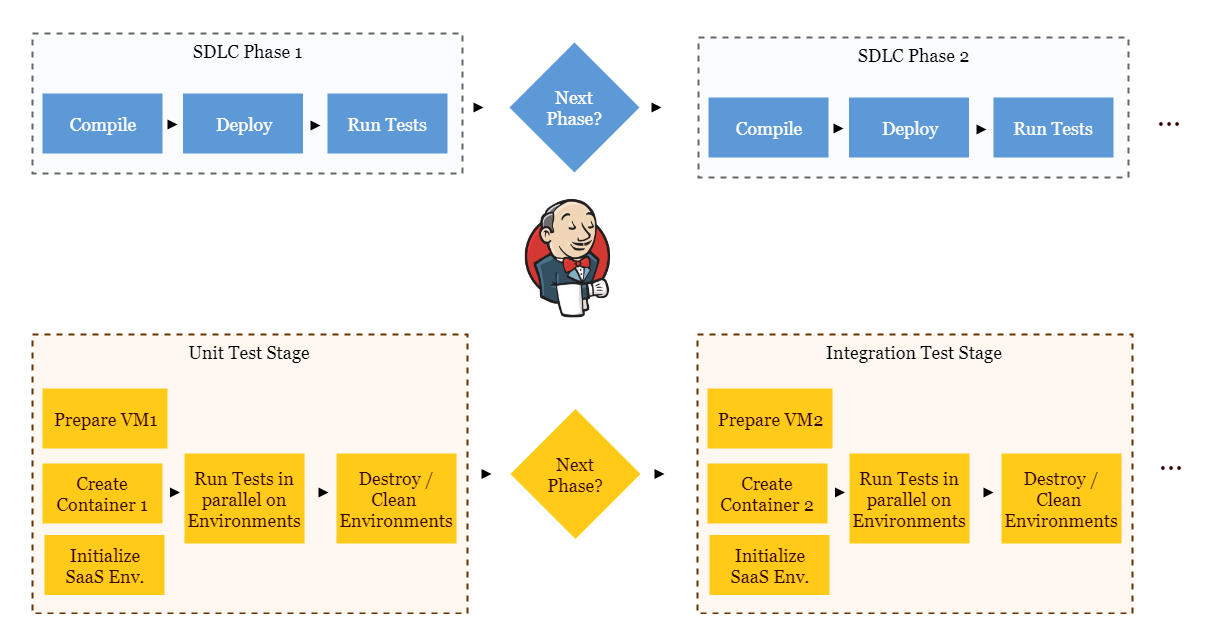
It’s a CI tool. This sentence provides no value into explaining what the tool does. So, let’s try again. It’s a tool which can build and deploy software and run post deployment tasks. A picture speaks a thousand words, so let me ‘draw’ a thousand words to elaborate that:

This process can start from different type of triggers provided. The AUT’s code is fetched, built and deployed, tests are run and moved on to the next stage to repeat the cycle or wait for a decision maker to confirm the next transition. With time there is a lot more you can do with Jenkins through the many plugins it has, however the main functionality is around these few main stages.
Jenkins does not bound the user to concrete stages (at least in Jenkins 2), these headings are therefore not representing exact phases you must use in Jenkins. Rather to provide an easy understanding about how it’s generally done.
Triggers
Back in the day someone would confirm from stakeholders once we are ready to move to the next stage of SDLC, then the release manager / team would deploy the next version from source control on the test environment. One this stage was completed; the next stage would require another correspondence and confirmation from a bunch of people followed up by hours long activities to patch the new environment.
Jenkins provides few basic triggers used to start the process of rolling our ‘Continuous Integration’ snowball down the hill. Triggers can be defined against a new code changes / new version in our source control. As soon as a new version is found by Jenkins on the SCM (Source Control Management), it triggers the process. Other common triggers are time / date specific or other configurations the tool can poll for. Mostly it’s based on new versions in the SCM.
Build Process
The first thing once the process initiates is to build the code. For larger applications this can mean a lot of small steps. To keep it simple, you will check out the latest queries for building the database and latest code repo for your code project and build (compile and package) the code. This would vary from team to team on how the processes are designed so there no single best practice IMHO (there certainly are bad practices which are beyond the scope of this article).
In many cases this would not be a complex activity, a few configurations and you’d be good to go. Specially if you are using build automation / package manager tools like maven or npm. Checking out the code would be one config line, and another to compile and build that code and your done for this stage.
Deploy
This is going to vary a lot, perhaps might not even be considered as a separate stage and you’d just add another step after building the code. Or if you are creating a new environment on the runtime for your tests (perhaps using docker) this would be a separate stage. The purpose here is to just deploy your AUT in the environment you want it to be tested in.
An important point to mention, if you have automation scripts to run (which should be the case) that would also be a part of the checking out and ‘deploying’. These tests might not be installed on a server, but certainly before you run those tests they would be fetched from a source control. Therefore, if you are building your environment, any pre-requisite tool deployments and test code / tools needed would be a part of the process here as well.
Test and Package
Once you have your environment ready and tests in hand, it’s time to run them and find out if we have any problems. Jenkins has its own reporting process which can be customized using plugins. This allows to see the results of all the tests executed, and can be consumed in different forms including sent as notifications in emails. You can also archive your code base if needed for revisioning purposes at the end of this stage.
Agents (Slave nodes)
I too dislike the slave notation but it makes things easier to understand. Jenkins can interact with a lot of tools sitting on different machines / environments. Typically, a decent Jenkins setup might be interacting with quite a few environments at the same time giving instructions and getting feedback. This is how you can have parallel test runs using Jenkins.
Environments can be created using different methods ranging from a physical machine to VMs to containerized environments (e.g. docker) or use SaaS tools like Sauce Labs / Browser Stack or Selenium grid. Out of these pros and cons for each and method to decide what to use would be a separate topic to discuss.
This example might be non-practical but illustrates the different ways these environments can be created / tests executed.

Plugins and integrations
The best thing I like about Jenkins is the number of plugins available to support many tools and libraries. All commonly used platforms provide plugins for Jenkins including test libraries and tools. Other plugins can be used to further configure Jenkins and allow to perform other complex tasks including customization and exporting of test results.
I must mention here, it’s a good idea to make sure whatever tool you are using around CI stages, it must support Jenkins. Most tools do, but if you get stuck with one that does not, it is not far-fetched if you’d have to look for a replacement which does.
Jenkins 2.0
There has been a lot of advancement in Jenkins since its earlier versions, especially when CI is becoming a more common practice across the industry. One major difference is the ‘pipeline’ method of creating ‘jobs’ in Jenkins which was not available in the earlier version. The traditional ‘freestyle jobs’ of Jenkins has specified stages for a job in a specific sequence, however the pipeline type job available in Jenkins 2.0 is script based written in Groovy. This allows for a lot more flexibility and customization to the process.
Other considerable changes in version 2.0 include a greater set of default plugins installed (making the first time use of the tool easier) and many supported plugins including the blue ocean plugin (creates a different GUI for the tool). It’s recommended to use version 2.0 for someone starting off now to take advantage of all the features.


Leave A Comment